![]() The Museum of HP Calculators
The Museum of HP Calculators
Contents:
A simple program is essentially just the keystrokes you would press to solve the program manually. The calculator remembers a sequence of keys and executes them in order at the touch of a key. In the simplest programs, there is only the addition of GTO 00 at the end.
To enter a program press GTO 00 and then slide the TIMER-PRGM-RUN switch to PRGM.
With the TIMER-PRGM-RUN switch set to PRGM (program) the number you see on the left side indicates the step number. As keystrokes are entered, their row/column codes will be displayed on the right. Step 00 is really just a placeholder. The first keys you press will go into step 01.
Enter the program below to compute the area of a circle:
g
x2         These three instructions
f
pi         are just the normal keystrokes
×          for computing the area given the radius in X
GTO 00     Go back to the automatic stop at the top of memory
Now set the TIMER-PRGM-RUN switch to RUN and set the program counter by pressing GTO 00 or BST (your choice). To run the program, key in a radius and press R/S. After the display stops flashing, the area is displayed. The program can be run as many times as you like by entering new values and pressing R/S. For many simple programs, that's all you need to know!
Many programs only require data to be entered at the beginning as the one above did. Remember that you can use the stack and store values in registers before execution. You can also enter R/S instructions into the program to allow additional data to be entered. The user can enter the data and then press R/S to resume. If you create a program that runs for too long (possibly due to an infinite loop) you can stop it by pressing R/S and if necessary, resume it by pressing R/S again. If you press R/S in the middle of a program, you can see where the program is executing by pressing and holding SST (see below) or switching to PRGM mode.
The following commands are used to edit or step through programs and are not recordable.
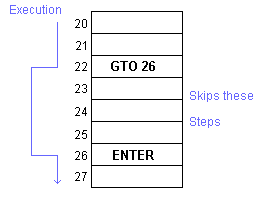
GTO nn can be used in run mode to position the calculator to step nn. The calculator can then be switched to PRGM mode for editing at that step. Unlike the instructions above, this one is recordable so the position of the TIMER-PRGM-RUN switch must be properly set.
Entering an instruction causes the new instruction to be placed after the instruction displayed and overwriting the following instruction. To replace a single instruction, display the instruction before the error and key in the correct instruction which will replace the error. If you find that you need to add instructions to a program, you can either rewrite it from the point of the error on down, or you can insert a GTO nn at the point where the new instructions would be needed, perform the new steps elsewhere and use a GTO to go back to the step after the first GTO. Remember to include the instruction that was overwritten by the first GTO in your new block of code. For example:
Original code;
...
10 -
11 STO
12 1       Oops! Need to square x and take the log before storing!
13 RCL
14 .
15 2
...
Patched code:
...
10 -
11 GTO 40     Overwrite STO with a jump to some unused memory
12 1          This 1 is hanging around from the STO 1
13 RCL        Jump back here to continue
14 .
15 2
...
40 g          The new steps
41 x2
42 f
43 log
44 STO        The step overwritten by GTO 40
45 1
46 GTO 13     Return to the normal program flow
(Don't be tempted to try to reuse the "hanging" 1 by expecting STO, GTO 12, 1 to store the result in register 1. It won't work.)
The HP-55 uses step addressing allowing you to jump to any line.
The program below adds 1 to the X register and displays it. When you press R/S it will do it again. It will run for as long as you continue to press the R/S key. Key it in after pressing BST and switching to PRGM mode.
1             top of the loop
+
R/S           display and wait for user to press R/S
GTO 01        loop
Now switch to RUN mode, press BST, enter a number, press R/S, and when it stops, press R/S again. When you get tired of it, just stop pressing R/S. (Note that you really didn't have to press GTO 00 in this case because when you left PRGM mode, you left the calculator on a GTO 01 instruction. Had you pressed R/S, it would have started by jumping to step 01 and working normally anyway. Still, it's a good idea to get in the habit of pressing GTO 00 or BST after switching to RUN mode.)
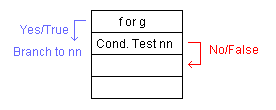
The HP-55 has two instructions for comparing X to Y. These instructions are different from the conditional skip instructions found on most HP calculators. They are:
This example computes the arc sine of a value in X (-1 ≤ x ≤ 1). If the result is less than zero, it adds 360 to the angle. Press BST, switch to PRGM mode, and then enter:
g
sin-1     Calculate arc sine
0
f
x≤y 12    If greater than zero, roll down, display (displays as -12)
R↓        Get the zero off the stack
3
6
0
+         Otherwise add 360 to result
GTO 00
R↓        Get the zero off the stack
GTO 00
Switch to RUN mode, press BST so the calculator goes to step 00 and press f DEG to set degrees mode. Now press .5 R/S to see a result of 30 and .5 CHS R/S to see a result of 330.
R/S can be used as an instruction or pressed from the keyboard. If a program is stopped, pressing R/S starts it. If the program is running, pressing R/S stops it. An R/S can also be inserted into a program to allow the user to input or record data.
For example, this program accepts the length and radius of a cylinder. It computes the area of the base and stops to allow the answer to be recorded. When the user restarts it, it computes the volume.
g
x2          Radius squared
f
pi
×           Area of the base
R/S         Allow user to record it
×           Multiply by length still on the stack
GTO 00
Slide the TIMER-PRGM-RUN switch to RUN, press BST, key in a length and press ENTER. Then key a radius and press R/S. After the area is displayed press R/S again to display the volume.
The HP-55 does not have built-in INT or FRAC functions, however, if the number is known to be positive, INT can be implemented by adding and then subtracting 1 EEX 9 from a number. This simply pushes the fractional part of the number beyond the calculator's precision. FRAC can be implemented by subtracting the INTeger part (as just obtained) from the original number. A few additional steps are needed if the sign is unknown.
![]() Go back to the HP-55
Go back to the HP-55
![]() Go back to the software library
Go back to the software library
![]() Go back to the main exhibit hall
Go back to the main exhibit hall