A coincidence, really, but I just finished restoring this HP 34C!
Message #1 Posted by Geoff Quickfall on 23 May 2009, 6:51 p.m.
It started with another box with 4 spice calculators in it as well as 4 chargers, and 3 metal battery holders with one plastic separator. Also included was a 34C and 38E quick reference cards.
I have ignored the spice series for awhile and decided to tackle the 34C, as this unit really is impressive. Not only does it have the program continuous memory but also a 3 colour coded set of shift keys reminiscent of the HP 67.
This unit is coded 2045SXXXXX for 1980, Singapore.
Of course the first order of business was to inspect the case, top and bottom shell. You can see glue residue on the top LED display cover; figure 1. Also note the filthy keyboard and keys. The ON/OFF key was intermittant at best and would not stay on once selected. By pressing gently on the key I got the display to be stable, where upon I pressed "STO" followed by "ENTER". I waited a few seconds and up popped the -8,8,8,8,8,8,8,8,8,8,. Signifying a successful electronics test. The keyboard response on this calculator is nothing less then stunning. The positive click on each key is incredible.
FIGURE 1.

I then turned the calculator upside down to document the bottom shell when I noticed a bunch of dirt fall out of the now inverted calculator. You can see, with reference to the Canadian penny for scale, the outline of the calculator (enhanced with the boxes); figure 2. This is the dirt that fell out of the spaces between the keys and the keyboard bezel. A close up of the dirt can be seen in figure 3 with R/S key for scale. I was amazed that the keyboard functioned at all as this calculator looks as though it was buried in the sand for a prolonged period of time! However this is a testament to the HP quality and the sealed keyboard.
FIGURE 2

FIGURE 3

Eventually I took a picture of the bottom shell with the glued on label; figure 4.
FIGURE 4

The battery compartment, battery holder and battery compartment contacts are all in excellent condition with no corrosion traces or cracks; figure 5, 6, and 7 respectively.
FIGURE 5

FIGURE 6

FIGURE 7

Of course the hardest part about a spice restoration is entering the case! After undoing the screws, I inserted a sharp long bladed knife between the upper shell and bottom shell at the foot of the calculator. This separated the bottom half of the calculator enough (a knifes blade in width) to allow me to simutaneously pull the upper half apart, and push the bottom shell down longitudinally to the calculator. You can see the L shaped clip that resides at the foot of the calculator that causes such a problem for shell separation; figure 8. This is the reason for separating the lower halves with the knife to allow the two halves to slide apart.
FIGURE 8

Once inside, luckely without breaking or cracking the case, I was able to expose the top shell back; figure 9. Also the inside portion of the top shell holding the framework and PCB; figure 10.
After removing the framework, holding the entire PCB in the case, by gently prying three clips out of the way on one side and lifting one edge of the PCB out, I was able to gain access to the keys and upper shell; figure 11.
FIGURE 9

FIGURE 10

FIGURE 11

The keyboard was now exposed indicating the problem with both switches. They were encrusted with a yellow stain and gritty dust; figure 12. A close up of the ON/OFF switch cleaned in contrast to the PRGM/RUN switch on the left can be seen in figure 13. Finally figure 14 shows both switch contact areas cleaned and greased ready for assembly.
FIGURE 12

FIGURE 13
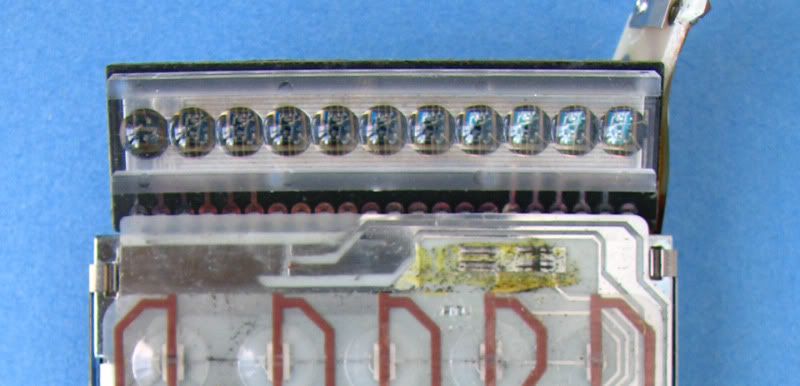
FIGURE 14

This calculator has the floating (non-soldered) IC's and since the calculator passed the self test I did not think it wise to open up the next set of clips and expose the IC's. I did give this calculator a good dusting down with a blower and then tested it before reassembly. I must say that the dirt was confined to the exterior portion of the keypad and that the cello wrapped key pad was perfectly protected from dirt intrusion.
The case was gently cleaned in soapy warm water with natural soft bristled paint brush. After applying some citrus oil to the goop on the LED cover lense I managed to remove the detritus and expose the mildly scratched cover. A bit of plastic watch crystal polish cleared up the scratches. A touch paint around the ON/OFF switch bezel completed the top shell.
The bottom shell lable was also removed via the citrus oil and the case cleaned. Each key appeared to be covered in a dirt/oil/grime residue so the were individually scrubbed with a tooth brush.
Everything was dryed in my drying box and then the calculator was tested without the back in place with the self test; figure 15.
The end result as seen in figure 16 and a side by side comparison of before and after can be seen in figure 17.
FIGURE 15

FIGURE 16

FIGURE 17

Hope you enjoyed this little presentation!
Cheers, Geoff
Edited: 23 May 2009, 6:53 p.m.
|